Passer directement au contenu Passer directement au menu de navigation

Sägeketten schärfen

Video zum Sägeketten Schärfen mit Feile

Um eine Sägekette zu schärfen gibt es im Wesentlichen zwei Methoden: manuelles Schärfen mit der Feile oder das Verwenden eines Sägekettenschärfgeräts. Informationen zur Einrichtung und sonstige Anweisungen finden Sie in der Bedienungsanleitung Ihres Schärfgeräts. Schärfen Sie Ihre Kette so, dass sie den Empfehlungen des Herstellers entspricht.

Teile eines Schneiders

Teile eines Schneiders

1. Zahndach
2. Schneidkante
3. Seitenplatte
4. Zahnkehle
5. Tiefenbegrenzer
6. Zahnferse
7. Nietloch
8. Zahnfuß
 

Vorbereitung zum Schärfen einer Sägekette

Wenn Sie Fragen zum Schärfen Ihrer Oregon-Kette haben, rufen Sie unsere technische Serviceabteilung unter +49 711 30033-400 an, von Montag bis Freitag zwischen 7:30 Uhr und 16:00 Uhr.

Schritt 1

Schritt 1

Stellen Sie sicher, dass die Kettensäge ausgeschaltet ist, bevor Sie Wartungsarbeiten durchführen. Bevor Sie Ihre Kettensäge schärfen, müssen Sie den Kettentyp und die Spezifikationen für den Schärfwinkel kennen. Diese Informationen finden Sie in der Betriebsanleitung Ihrer Kettensäge oder auf der Kettenpackung. Der Identifikationscode der Kette ist normalerweise auf dem Antriebsglied angegeben. Wenn Sie den Typ oder die Nummer Ihrer Kette nicht kennen, fragen Sie Ihren Oregon-Kettenhändler oder rufen Sie unsere technische Serviceabteilung unter +49 711 30033-400 an. 
Schritt 2

Schritt 2

Ziehen Sie Ihre Schutzausrüstung an, einschließlich Handschuhe und Schutzbrille. Wenn Sie die Kette schärfen, während sie an der Führungsschiene befestigt ist, vergewissern Sie sich zunächst, dass sie richtig gespannt ist.
Schritt 3

Schritt 3

Wischen Sie Öl und Fett von der Kette ab. Dieser Schritt verhindert, dass sich beim Schleifen Ablagerungen auf den Zähnen der Feile oder der Schleifscheibe bilden.
Schritt 4

Schritt 4

Untersuchen Sie die Sägekette auf Beschädigungen. Hier ist, worauf Sie achten sollten:
  • Ordnungsgemäße Installation von Verbiendungsgliedern und Antriebsgliedern
  • Gesprungene oder gebrochene Schneider, obere Schneider oder Verbindungsglieder
  • Verbogene, gesprungene oder verbrannte Antriebsglieder
  • Schwerer Schleifschaden
  • Ungewöhnlich abgenutzte Kette
  • Verschleißmuster, die auf eine abgenutzte Schiene oder ein abgenutztes Kettenrad hinweisen können. Weitere Informationen finden Sie im Sicherheits- und Wartungshandbuch für Oregon-Sägeketten.
  • Lose Nieten (Versuchen Sie, die Nieten mit den Fingern zu drehen. Wenn dies möglich ist, sind sie zu locker).
Schritt 5

Schritt 5

Wenn Sie Ihre Sägekette von Hand feilen, wählen Sie die richtige Feilenführung und Feile für Ihre Sägekette aus und verwenden Sie sie.  Dies ist die einfachste Art, die Sägekette zu feilen.
Schritt 6

Schritt 6

Wenn die Kette gerissen ist, müssen Sie sie reparieren oder ersetzen. Prüfen und justieren Sie anschließend den Tiefenbegrenzer. Schärfen Sie dann Ihre Kette gemäß den Empfehlungen des Herstellers und halten Sie sie im Gleichgewicht.

Sharpening with a Round File

The goal of filing is to remove all damage, while keeping the chainsaw chain balanced.

Step 1

Step 1

Engage the chain brake, then lightly clamp the chainsaw bar in bench vice. Then release the chain brake to be able to rotate the chain by hand (be sure to wear gloves when you do this).
Tool Tip

Tool Tip

Operate chain brake by pushing the top-hand guard forward. Pull guard back to disengage.
Step 2

Step 2

If you are using a file guide, place it over the cutter with the file in the gullet (between the cutter and the depth gauge). Make sure the file guide has two points of contact, one point of contact on the cutter top plate and two on the depth gauge.
Step 3

Step 3

Hold the file in the correct location so that 1/5", or 20%, of the file’s diameter is positioned above the cutter’s top plate. Using an Oregon File Guide is the easiest way to hold the file in this position. Check to see if the top plate filing angle should be parallel to chainsaw chain centerline.
Step 4

Step 4

Locate the cutter with the most damage. Sharpen using steady, even strokes (the "full file length") to remove the damage while counting the number of file strokes. You’ll know the damage is removed when the cutter has a shiny, silver face. File all of the cutters with the same number of strokes per cutter from the inside to the outside so that the cutter lengths are equal. 
Step 5

Step 5

Complete all the cutters on one side of the chain, before turning your chain to switch sides. File from the inside of each cutter to the outside. Complete all the cutters on one side of the chain. Once you are done, turn your saw around to repeat the process for the other side of the chain. Remember, keep all cutter lengths equal.
Step 6

Step 6

File back to remove damage and keep top plates equal in length. Recheck depth gauges.

Sharpening a Chainsaw Chain with an Oregon Electric Sharpener

Step 1

Step 1

Check the grinder wheel shape. 

 
Tool Tip

Tool Tip

Before installing a new or used grinding wheel, check the wheel for integrity by tapping the wheel with a metal object, such as an Allen Wrench. If you hear a dull thud, the wheel may be damaged from the inside and a replacement wheel may be needed.

Step 2

Set vise assembly to the correct top plate filing angle. Refer to your grinder’s manual to learn the best way to do this. We suggest grinding your chain so that it meets the recommendations of the manufacturer.
Step 3

Step 3

Use the recommended top-plate cutting angle to set the proper grinder head angle.
Step 4

Step 4

Check that the vise blocking handle is screwed in tight and that the chain is blocked. Turn on the electric sharpener. Sharpen the cutter by lowering the arm-motor unit. Tip: Use a quick tapping motion to minimize over heating of the ground surface.
Step 5

Step 5

When you are done sharpening the cutter, raise the arm and loosen the handle. Run the chain forward to position the next cutter to be sharpened.
Step 6

Step 6

Block again with the handle and sharpen. When all the cutters are sharpened, turn the machine off and unplug the power cable. Dress vitrified grinding wheels often to maintain correct shape. Use either a rotary dresser or a dressing brick.


After Sharpening a Chainsaw Chain

Step 1

Step 1

Check and adjust depth gauges using instructions found here.
Step 2

Step 2

Clean off any debris, then lubricate the chain thoroughly with bar and chain oil. For the best results, soak the chain overnight.

FAQ


When Should You Perform Square-Ground Filing?

Since square-ground chain is not very common, most chain saw operators will never have an occasion to perform filing with a square file. Square-ground chain is only used in conjunction with longer guide bars designed to cut larger trees. However, the performance advantages of cutting timber with square-ground chain can outweigh the fact the square-ground filing can be more difficult and affords less room for error.


Things to Keep in Mind the First Time You File Square-Ground Chain

While square-ground filing can be done out in the field, a shop with a light and a work bench is an ideal learning space. It’s easiest to file in a setting where your cutters are stable and there’s lots of light.


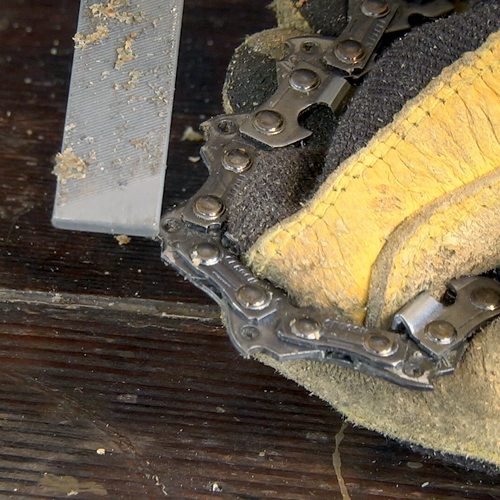
The first square-ground chain you sharpen should be a square-ground chisel chain that still has its factory grind. Do not use an old chain – especially one that has been previously filed. A chain that has already been resharpened may still have gullet material attached that needs to be removed.


Tip: A second, new square-ground chisel chain on hand can be a handy reference point for square-ground chain sharpening. You can look at the cutter teeth on the second chain to see what the cutter teeth should look like.
 

Three Rules for Sharpening Square-Ground Chain

  1. Keep the corner of the file aligned with the cutter’s tooth
  2. Maintain the angles of the cutter’s tooth
  3. Repeat the same angles on every tooth; all cutters need to be the same.


Where to Position the Square File

A square file sharpens the top-plate and the side plate, simultaneously.

This creates a line, (A), where the top-plate cutting angle meets the side-plate angle. For best results, file so that the line intersects the cutting corner (B).
To properly sharpen the cutter, use the correct filing position, as shown here from three different points of view. 

Square Filing Tip

Before you begin filing, place you square file next to the fact of a cutter tooth. Decide on the corner of the file you will align with the corner of the cutter tooth. When the corner is aligned, reposition the file on its other axis so the other surfaces match up. Reference the above graphics so you know what the right filing position looks like. 
 

Sharpening with a Square File

To start sharpening after you’ve gotten your angles lined up, take a file strokes with the file, then remove the remove and take a look at the cutter tooth. There will be some marks where the file has removed some steel. Adjust the file based on what you see. Continue sharpening until the tooth looks as sharp as the one of the reference chain.
 

After producing the first sharp cutter tooth, it’s time to move on and make the rest of the teeth look the same. The best way to do this is to look at the chain. Counting the number of strokes is only providing a rough estimate, since not all strokes remove the same amount of material.
 

Each tooth needs to be the same, because this will help ensure a consistent cut. If one tooth is bigger or smaller than the others, it will cut off different-sized chunks of wood, causing the chain to chatter and vibrate. This inaccuracy can also make it so the chain cuts crookedly.
 

What Kind of Square File Should You Use?

What Kind of Square File Should You Use?

There are three different types of square files: hexagon, double bevel, and “goofy”.

The most popular file type is the hexagon shape, also known as “triangular chisel file”. True to its name, a hexagonal file has six sides, plus three corners which act as the filing edge. Out of the three file types, the hexagonal file is the smallest in size and usually fits well into 3/8” pitch chain.

The other two file types – double bevel and “goofy” have two corners for sharpening and also allow people to lower depth gauges with surfaces on the top and bottom of the file.

Only use files specially designed for square-ground chisel cutters, available from your chain saw dealer.

Gullet Filing

Why File Gullet?

Why File Gullet?

Approximately every fifth sharpening, you will need to clean out the gullets by filing them back with a 7/32" round file. File gullets from the inside-out (the side opposite direction than sharpening), and always leave a 1/8" shelf behind the gullet. If you do not clean the gullets regularly, the outer edge will eventually prevent the working corners of your cutters from getting an adequate bite into the wood.
Correct Gullet Filing (Right)

Correct Gullet Filing (Right)

Clearance is maintained between the working corner and the gullet’s outer edge. Some square-ground chain users may prefer to file from the inside out (in an upward direction). Inside-out filing is much more difficult. Whichever direction you choose, be sure your file and your cutting edges stay positioned as previously shown. File all cutters on one side of the chain, then reverse the chain and repeat the process.
Incorrect Gullet Filing (Wrong)

Incorrect Gullet Filing (Wrong)

If the gullet is filed the wrong way, there is little or no clearance between the working corner and the gullet’s outer edge. Incorrect: Little or no clearance between the working corner and the gullet’s outer edge.

FAQ

How do I sharpen my chain?

There are two main methods you can use for sharpening chainsaw chain by hand, using a round chainsaw file or an electric chainsaw grinder. Learn how to sharpen chainsaw chain with our Technical Tips video.


How do I know when my chain is dull, and when should I sharpen it?

If it is no longer self-feeding, you have to push on the saw, or the waste material from your saw creates sawdust, it is time to sharpen your chainsaw chain. A good rule of thumb is to sharpen your chain every time you refill gas. 
 

Related Topics

Tightening Chainsaw Chain

Tightening Chainsaw Chain

Proper chainsaw chain tension is critical for the performance of your chainsaw. Learn how to check and tighten your saw chain to avoid the risk of kickback and chainsaw related injuries.
Maintaining Chainsaw Chain

Maintaining Chainsaw Chain

Become familiar with proper saw chain maintenance techniques and the possible dangers which can result if saw chain is not properly maintained.
Replacing Damaged Chainsaw Chain

Replacing Damaged Chainsaw Chain

Learn how to properly repair damaged cutter and join chain loops using chain rivet and chain breaker tools.
Setting-Up Your Chainsaw

Setting-Up Your Chainsaw

To get your chainsaw ready for optimal performance, follow these key lubrication and oil usage tips.
Part Finder

Part Finder

Find a full selection of saw chain specifically made to fit your chainsaw.

Product Manuals

We want to make sure you can get your job done right. Check out our Product Operations Manuals. 
Retour au début